Android tutorial - Layouts in android | Table Layout | Android TableLayout example - android app development - android studio - android development tutorial
Learn android - android tutorial - Layouts in android - android examples - android programs
TableLayout in Android:
- In Android, A table layout is a grid
which contains rows and columns, just like the standard table layout in HTML,
and . - Table Layouts are ideal for displaying tabular data. It can be also used to neatly align items on the screen.
- You can use TableLayout to organize UI (user Interface) or widgets. There is a table row control for each row in your table.
- TableRow is a layout where its elements are horizontally arranged. This object must always be used as a child of TableLayout.
- The children of the TableRow do not need to set the layout_width and layout_height attributes. These values are permanently MATCH_PARENT and WRAP_CONTENT respectively.
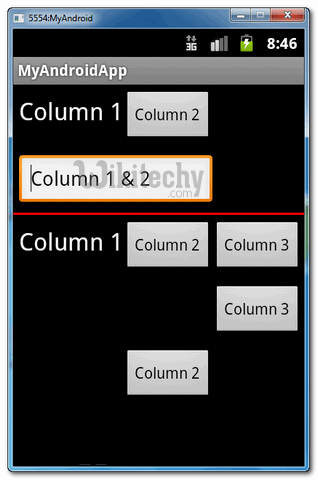
- In this tutorial, we show you how to use TableLayout to arrange button, textview and edit text in rows and columns format, and also demonstrates the use of “android:layout_span” to span view in 2 cells, and “android:layout_column” to display the view in specified column.
Note
- In Eclipse 3.7, XML code assist will not prompts the attribute “android:layout_span“, “android:layout_column” and many other useful TableLayout attributes, no idea why, may be bug. Just put the attribute inside, it’s still compile and run.
- P.S This project is developed in Eclipse 3.7, and tested with Android 2.3.3.
1. TableLayout:
- Open “res/layout/main.xml” file, add following views for demonstration. Read the XML comments, it should be self-explanatory.
- File : res/layout/main.xml
<?xml version="1.0" encoding="utf-8"?>
<TableLayout xmlns:android="http://schemas.android.com/apk/res/android"
    android:id="@+id/tableLayout1"
    android:layout_width="fill_parent"
    android:layout_height="fill_parent" >

    <!-- 2 columns -->
    <TableRow
        android:id="@+id/tableRow1"
        android:layout_width="wrap_content"
        android:layout_height="wrap_content"
        android:padding="5dip" >

        <TextView
            android:id="@+id/textView1"
            android:text="Column 1"
            android:textAppearance="?android:attr/textAppearanceLarge" />

        <Button
            android:id="@+id/button1"
            android:text="Column 2" />
    </TableRow>

    <!-- edittext span 2 column -->
    <TableRow
        android:id="@+id/tableRow2"
        android:layout_width="wrap_content"
        android:layout_height="wrap_content"
        android:padding="5dip" >

        <EditText
            android:id="@+id/editText1"
            android:layout_span="2"
            android:text="Column 1 & 2" />
    </TableRow>

    <!-- just draw a red line -->
    <View
        android:layout_height="2dip"
        android:background="#FF0000" />

    <!-- 3 columns -->
    <TableRow
        android:id="@+id/tableRow3"
        android:layout_width="wrap_content"
        android:layout_height="wrap_content"
        android:padding="5dip" >

        <TextView
            android:id="@+id/textView2"
            android:text="Column 1"
            android:textAppearance="?android:attr/textAppearanceLarge" />

        <Button
            android:id="@+id/button2"
            android:text="Column 2" />

        <Button
            android:id="@+id/button3"
            android:text="Column 3" />
    </TableRow>

    <!-- display this button in 3rd column via layout_column(zero based) -->
    <TableRow
        android:id="@+id/tableRow4"
        android:layout_width="wrap_content"
        android:layout_height="wrap_content"
        android:padding="5dip" >

        <Button
            android:id="@+id/button4"
            android:layout_column="2"
            android:text="Column 3" />
    </TableRow>

    <!-- display this button in 2nd column via layout_column(zero based) -->
    <TableRow
        android:id="@+id/tableRow5"
        android:layout_width="wrap_content"
        android:layout_height="wrap_content"
        android:padding="5dip" >

        <Button
            android:id="@+id/button5"
            android:layout_column="1"
            android:text="Column 2" />
    </TableRow>

</TableLayout>
click below button to copy the code from android tutorial team
2. Demo - android emulator - android tutorial :

World's No 1 Animated self learning Website with Informative tutorials explaining the code and the choices behind it all.
© 2016 - 2026 KaaShiv InfoTech, All rights reserved. Powered by Inplant Training in chennai | Internship in chennai