Android tutorial - analog clock | Digital Clock - android app development - android studio - android development tutorial
Learn andriod - andriod tutorial - Analog clock - andriod examples - andriod programs
- The android.widget.AnalogClock and android.widget.DigitalClock classes provides the functionality to display analog and digital clocks.
- Android analog and digital clocks are used to show time in android application.
- Android AnalogClock is the subclass of View class.
- Android DigitalClock is the subclass of TextView class. Since Android API level 17, it is deprecated. You are recommended to use TextClock Instead.
- In android, you need to drag analog and digital clocks from the pallet to display analog and digital clocks. It represents the timing of the current device.
- Analog clocks usually indicate time using angles.
- Digital clocks display a numeric representation of time.
- Two numeric display formats are commonly used on digital clocks:
- 24-hour notation and
- 12-hour notation.
- Most digital clocks use electronic mechanisms and LCD, LED, or VFD displays.
- For convenience, distance, telephony or blindness, auditory clocks present the time as sounds.
1. AnalogClock and DigitalClock
- Open “res/layout/main.xml” file,
- add AnalogClock and DigitalClock in XML.
- File : res/layout/main.xml
<?xml version="1.0" encoding="utf-8"?>
<LinearLayout xmlns:android="http://schemas.android.com/apk/res/android"
    android:layout_width="fill_parent"
    android:layout_height="fill_parent"
    android:orientation="vertical" >

    <TextView
        android:id="@+id/textView1"
        android:layout_width="wrap_content"
        android:layout_height="wrap_content"
        android:text="Analog Clock"
        android:textAppearance="?android:attr/textAppearanceLarge" />

    <AnalogClock
        android:id="@+id/analogClock1"
        android:layout_width="wrap_content"
        android:layout_height="wrap_content" />

    <TextView
        android:id="@+id/textView2"
        android:layout_width="wrap_content"
        android:layout_height="wrap_content"
        android:text="Digital Clock"
        android:textAppearance="?android:attr/textAppearanceLarge" />

    <DigitalClock
        android:id="@+id/digitalClock1"
        android:layout_width="wrap_content"
        android:layout_height="wrap_content"
        android:text="DigitalClock" />

</LinearLayout>
click below button to copy the code from android tutorial team
2. Code
- File : MyAndroidAppActivity.java
package com.wikitechy.android;

import android.app.Activity;
import android.os.Bundle;
import android.widget.AnalogClock;
import android.widget.DigitalClock;

public class MyAndroidAppActivity extends Activity {

	@Override
	public void onCreate(Bundle savedInstanceState) {
		super.onCreate(savedInstanceState);
		setContentView(R.layout.main);

		AnalogClock ac = (AnalogClock) findViewById(R.id.analogClock1);
		//what can i do with AnalogClock?

		DigitalClock dc = (DigitalClock) findViewById(R.id.digitalClock1);
		//what can i do with DigitalClock also? for display only

	}

}
click below button to copy the code from android tutorial team
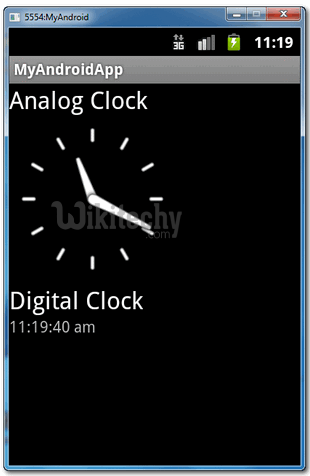
3. Demo - android emulator - android tutorial
- Run the application
- This is how AnalogClock and DigitalClock look like