Android tutorial - image viewer for android - android app development - android studio - android development tutorial
What is Image View
- Android is enriched with some of the best User interface design widgets. That allows you to build robust and good looking ui based application.
- Image View is one of the UI widget that is used to display images in your Application. Image View is come with different configuration options to support different scale Types.
- In Android, you can use “android. widget. Image View” class to display an image file. Image file is easy to use but hard to master, because of the various screen and dpi in Android devices.
- In this tutorial, we didn’t go in deep about dpi and various screen issue, we just use ImageView to display a “png” image, when user click on a button, it will change to another “png” image.
Add Image to Resources
- Put your images into folder “res/drawable-ldpi“, “res/drawable-mdpi” or “res/drawable-hdpi“.
- See figure below, no matter which folder you put, Android will find your image automatically. In this case, both “android.png” and “android3d.png” images are used for Demo - android emulator - android tutorialnstration.
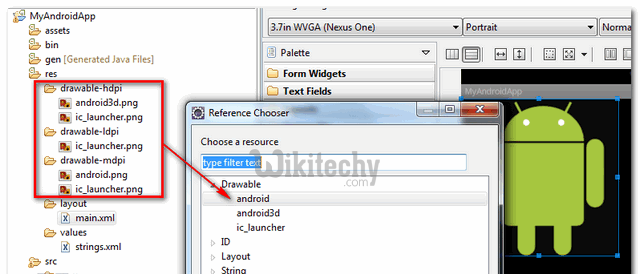
- Again, read official Android’s "Drawable Resource" and "Screen Support" article to understand what is dpi and resources in Android.
Add Image View
- Open “res/layout/main.xml” file, just add an ImageView and Button for Demo - android emulator - android tutorialnstration. By default, imageView1 will display “android.png”.
File : MyAndroidAppActivity.java
<?xml version="1.0" encoding="utf-8"?>
<LinearLayout xmlns:android="http://schemas.android.com/apk/res/android"
    android:layout_width="fill_parent"
    android:layout_height="fill_parent"
    android:orientation="vertical" >

    <ImageView
        android:id="@+id/imageView1"
        android:layout_width="wrap_content"
        android:layout_height="wrap_content"
        android:src="@drawable/android" />

    <Button
        android:id="@+id/btnChangeImage"
        android:layout_width="wrap_content"
        android:layout_height="wrap_content"
        android:text="Change Image" />

</LinearLayout>
click below button to copy the code from android tutorial team
File : MyAndroidAppActivity.java Code
- Simple, when button is clicked, change it to “android3d.png”.
File : MyAndroidAppActivity.java
package com.wikitechy.android;

import android.app.Activity;
import android.os.Bundle;
import android.widget.Button;
import android.widget.ImageView;
import android.view.View;
import android.view.View.OnClickListener;

public class MyAndroidAppActivity extends Activity {

	Button button;
	ImageView image;

	@Override
	public void onCreate(Bundle savedInstanceState) {
		super.onCreate(savedInstanceState);
		setContentView(R.layout.main);

		addListenerOnButton();

	}

	public void addListenerOnButton() {

		image = (ImageView) findViewById(R.id.imageView1);

		button = (Button) findViewById(R.id.btnChangeImage);
		button.setOnClickListener(new OnClickListener() {

			@Override
			public void onClick(View arg0) {
				image.setImageResource(R.drawable.android3d);
			}

		});

	}

}
click below button to copy the code from android tutorial team
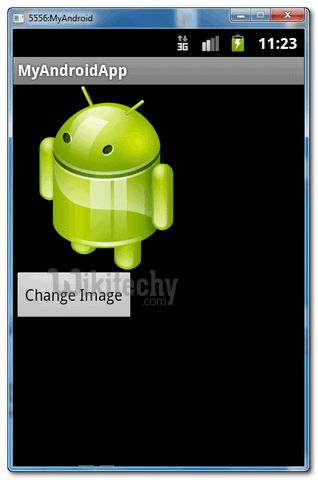
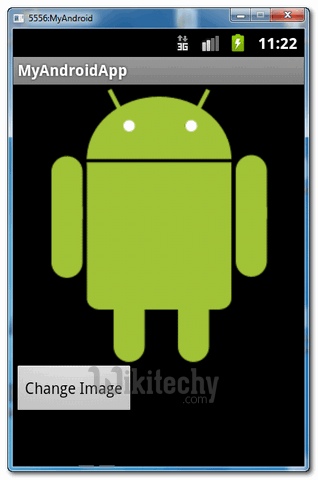
Demo - android development tutorial - android emulator - android tutorial
- Run the application.
- Result, “android.png” is displayed.
- Click on the button, image will changed to “android3d.png”.