ionic tutorial - Ionic Checkbox | Checkbox - ionic - ionic development - ionic 2 - ionic framework
- Ionic checkbox is almost the same as toggle. The two are styled differently but are used for the same purposes.
- The Checkbox is a simple component styled based on the mode. It can be placed in an ion-item or used as a stand-alone checkbox.
ionic tutorial . extension , ionic framework , ionic , ionic framework book , ionic app example , ionic templates , ionic getting started
Adding Checkbox
- When creating checkbox form you need to add checkbox class name to both label and input elements.
- Example below shows two simple checkboxes, one is checked and the other is not.
<label class="checkbox">
   <input type="checkbox">
</label>

<label class="checkbox">
   <input type="checkbox">
</label>
Click below button to copy the code. From wikitechy - ionic tutorial - ionic framework tutorial - team
- Above code will produce following screen
ionic tutorial . extension , ionic framework , ionic , ionic framework book , ionic app example , ionic templates , ionic getting started
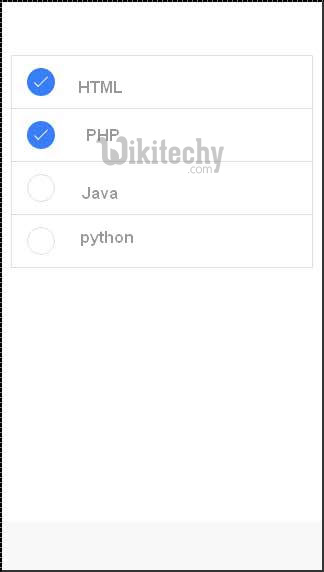
Multiple Checkboxes
- As we already showed, the list will be used for any multiple elements. Now we will use item-checkbox class for each list item.
<ul class="list">
<li class="item item-checkbox">
   HTML
   <label class="checkbox">
   <input type="checkbox">
   </label>
</li>

<li class="item item-checkbox">
   PHP
   <label class="checkbox">
   <input type="checkbox">
   </label>
</li>

<li class="item item-checkbox">
   Java
   <label class="checkbox">
   <input type="checkbox">
   </label>
</li>

<li class="item item-checkbox">
   python
   <label class="checkbox">
   <input type="checkbox">
   </label>
</li>

</ul>
Click below button to copy the code. From wikitechy - ionic tutorial - ionic framework tutorial - team
- Above code will produce following screen
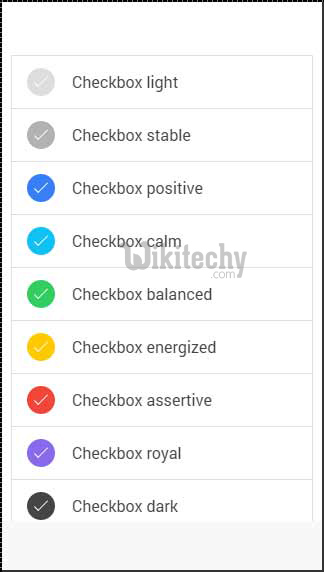
Styling Checkbox
- When you want to style checkbox, you need to apply any Ionic color class with checkbox prefix.
- Check example below to see how it looks like. We will use list of checkboxes for this example.
<ul class="list">
<li class="item item-checkbox checkbox-light">
   Checkbox 1
   <label class="checkbox">
   <input type="checkbox">
   </label>
</li>

<li class="item item-checkbox checkbox-stable">
   Checkbox 2
   <label class="checkbox">
   <input type="checkbox">
   </label>
</li>

<li class="item item-checkbox checkbox-positive">
   Checkbox 3
   <label class="checkbox">
   <input type="checkbox">
   </label>
</li>

<li class="item item-checkbox checkbox-calm">
Checkbox 4
<label class="checkbox">
<input type="checkbox">
</label>
</li>

<li class="item item-checkbox checkbox-balanced">
   Checkbox 5
   <label class="checkbox">
   <input type="checkbox">
   </label>
</li>

<li class="item item-checkbox checkbox-energized">
   Checkbox 6
   <label class="checkbox">
   <input type="checkbox">
   </label>
</li>

<li class="item item-checkbox checkbox-assertive">
   Checkbox 7
   <label class="checkbox">
   <input type="checkbox">
   </label>
</li>

<li class="item item-checkbox checkbox-royal">
   Checkbox 8
   <label class="checkbox">
   <input type="checkbox">
   </label>
</li>

<li class="item item-checkbox  checkbox-dark">
   Checkbox 9
   <label class="checkbox">
   <input type="checkbox">
   </label>
</li>

</ul>
Click below button to copy the code. From wikitechy - ionic tutorial - ionic framework tutorial - team
- Above code will produce following screen