laravel install | Laravel - Installation
How to Install Laravel?
- For managing dependencies, Laravel uses composer.
- Ensure you have a Composer installed on your system before you install Laravel.
- So, before using Laravel, make sure you have Composer installed on your machine.
Step 1
- Visit the following URL and download composer to install it on your system.
laravel , laravel framework , laravel documentation , laravel tutorial , laravel install , laracasts
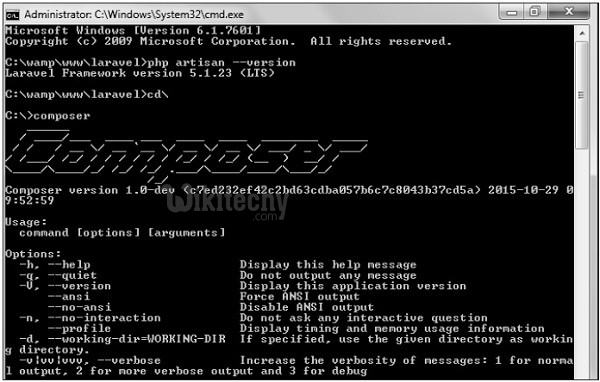
Step 2
- After the Composer is installed, check the installation by typing the Composer command in the command prompt as shown in the following screenshot.
Step 3
- Create a new directory anywhere in your system for your new Laravel project.
- After that, move to path where you have created the new directory and type the following command there to install Laravel.
composer create wikitechy-project laravel/laravel --prefer-dist
laravel , laravel framework , laravel documentation , laravel tutorial , laravel install , laracasts
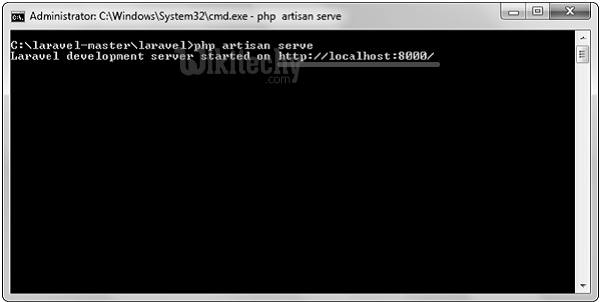
Step 4
- The above command will install Laravel in the current directory. Start the Laravel service by executing the following command.
php artisan serveStep 5
- After executing the above command, you will see a screen as shown below
laravel , laravel framework , laravel documentation , laravel tutorial , laravel install , laracasts
Step 6
- Copy the URL underlined in gray in the above screenshot and open that URL in the browser.
- If you see the following screen, it implies Laravel has been installed successfully.