
How to take a screenshot on a Mac is one of the most common questions Mac users have, especially if you’re new to macOS. Whether you’re saving an online receipt, capturing a funny meme, or showing a tech issue to a friend, knowing how to take a screenshot on a Mac can be super helpful.
This guide will walk you through 7 easy methods to take a screenshot on a Mac using keyboard shortcuts, in-built tools, and even third-party apps. 
 Key Highlights
 Learn how to take screenshots on a Mac using simple shortcuts
 Includes methods for full screen, window, and custom screenshots
 Covers both native and third-party screenshot tools
 Beginner-friendly tips to boost your productivity on macOS
 Why Learning How to Take a Screenshot on a Mac Matters
Screenshots help you:
- Save digital proof (like receipts or chat messages)
- Share your screen with others easily
- Document your work or bugs for tech support
- Create tutorials or presentations
If you’re switching from Windows or using a Mac for the first time, you might wonder, “Where’s the Print Screen button?” Don’t worry — we’ve got you covered!

 1. Use Shortcut: Command (⌘) + Shift + 3 – Full Screen Screenshot
This is the easiest way to take a screenshot on a Mac of the entire screen.
How to Use:
- Press
Command (⌘) + Shift + 3 - You’ll hear a camera click

- The screenshot will appear on your desktop
Pro Tip: If you have multiple monitors, macOS will capture all screens in separate image files.
 2. Use Shortcut: Command (⌘) + Shift + 4 – Select Area to Screenshot
Want to capture just a portion of the screen? This method is perfect.
How to Use:
- Press
Command (⌘) + Shift + 4 - Your pointer changes to a crosshair

- Click and drag to select the area
- Release to take the screenshot
This is the most flexible way to take screenshot Mac users love.
 3. Use Shortcut: Command (⌘) + Shift + 4, then Spacebar – Capture Window
This captures a specific window — great for apps, Finder, or browser windows.
How to Use:
- Press
Command (⌘) + Shift + 4 - Press
Spacebar(you’ll see a camera icon) - Click the window you want to capture
Perfect when you need clean, precise images!
 4. Use Shortcut: Command (⌘) + Shift + 5 – Open Screenshot Toolbar
This opens the built-in screenshot tool with more options:
- Capture entire screen
- Capture selected window
- Capture portion of the screen
- Record screen (yes, videos too!)
Just press Command (⌘) + Shift + 5, and a floating toolbar appears. You can even change where screenshots are saved — like Documents or a custom folder.
 Visit Apple’s official guide on Mac screenshots for more info.
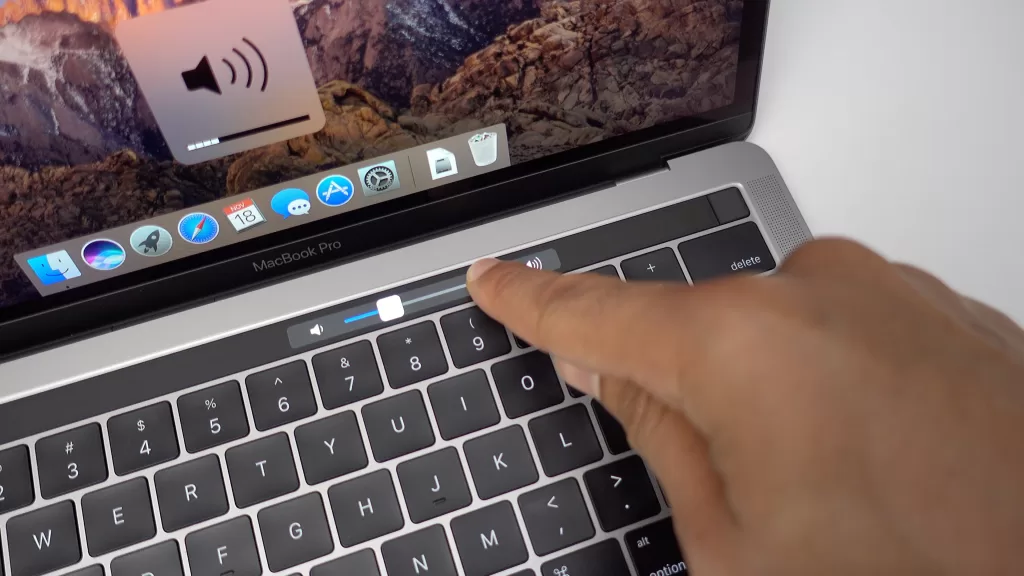
 5. Use the Touch Bar (for MacBook Pro users)
If your Mac has a Touch Bar, you can customize it to include a screenshot button.
How to Enable:
- Go to System Settings > Keyboard
- Click “Customize Control Strip”
- Drag the Screenshot icon to your Touch Bar
Now, just tap the icon to take a screenshot on a Mac in seconds! 
 6. Use Preview App – Less Known But Powerful!
Did you know Preview isn’t just for PDFs and images?
How to Use Preview to Take Screenshot Mac:
- Open Preview
- Go to
File > Take Screenshot - Choose from options: From Selection, Window, or Entire Screen
This method is handy when you’re already editing something in Preview.

 7. Use Third-Party Apps for Extra Features
If you want more control, editing options, or cloud syncing, check out these awesome tools:
 CleanShot X – The best pro-level screenshot tool for macOS
- Snagit – Ideal for screen recording and advanced annotation
- Lightshot – Simple and fast with cloud uploads
- Monosnap – Great for developers and productivity lovers
These apps offer better editing tools than the default options and help boost your productivity.
 Where Are My Screenshots Saved?
By default, your Mac saves screenshots to the Desktop. But you can change the save location via:
Command + Shift + 5 > Options > Save To
Choose from Desktop, Documents, Clipboard, or even Mail — super handy! 
 How to Edit Your Mac Screenshot After Taking It
After capturing a screenshot, a thumbnail appears in the bottom-right corner. Click it to:
- Crop or annotate
- Add text or shapes
- Highlight key areas
- Share instantly via Messages or Mail
This built-in Markup tool makes your workflow much smoother!
 Bonus Tip: Take Screenshots in Private or Incognito Windows
macOS allows you to take screenshot Mac even when you’re using Private Mode in browsers like Safari or Chrome. However, you’ll need to enable permissions for screen recording in:
System Settings > Privacy & Security > Screen Recording
 FAQs – How to Take a Screenshot on a Mac
Q. Can I change the file format of my Mac screenshots?
Yes! Use Terminal to change from PNG to JPG or PDF. Example:
bashCopyEditdefaults write com.apple.screencapture type jpg; killall SystemUIServer
Q. Can I take a screenshot using Siri?
Not directly. But you can open apps like Preview via Siri and take a screenshot from there.
Q. Is there a way to copy the screenshot to clipboard?
Yes! Use Control + Command + Shift + 3 or 4. Then paste into any app like Notes or Mail. 
 Related Articles You Might Like
Final Thoughts: Now You Know How to Take a Screenshot on a Mac
Whether you’re a student, designer, developer, or just browsing the web — screenshots are essential. With these 7 easy methods, you now know how to take a screenshot on a Mac like a pro! 
So go ahead and try these out — and don’t forget to bookmark this guide for future reference.
If you found this guide helpful, share it with a friend who’s new to Mac! 


 Top 10 Video Search Engines to Instantly Find Any Video Online (2025 Guide)